Author Archives: admin

tracks

click here to DOWNLOAD the source and a help patch.

Information:

The [tracks] object is designed to find the best continuity between indexed information. Usually tracking objects output data in order of appearance and need further logic to achieve continuity. Best continuity is defined as the smallest euclidean distance between two points in contiguous frames of time.

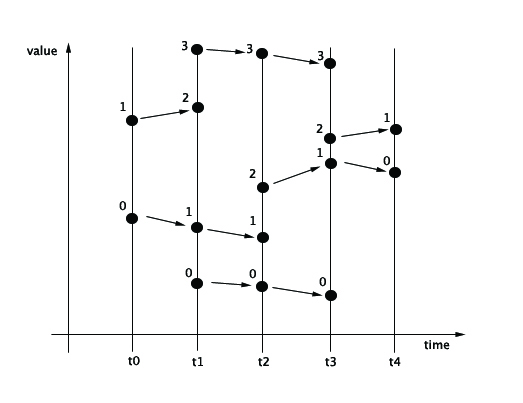
The graphic representation below is a one dimensional example:

In the graph, arrows show tracks with the best possible continuity.

A maximum distance determines if a datum will be kept in the same track. For example index 2 in t1 and index 2 in t2, have a distance of 24. if the maximum distance is 20, a new track will be created.

[tracks] will behave in the following way, for more information, see the help-file:

Time t0 t1 t2 t3 t4
input 0 50 0 20 0 19 0 17 0  65
1 80 1 47 1 40 1 68 1 78
2 84 2 60 2 75
3 100 3 98 3 95
re-indexed
input 0 50 0 47 0 40
(outlet 1) 1 80 1 84 1 75 1 78
2 20 2 19 2 17
3 100 3 98 3 95
4 60 4 68 4 65
tracks
(outlet 2) -1 0 1 0 1 0 -2 0
-1 1 2 1 -2 1 -1 1 1 1
-1 2 0 2 0 2 -2 2
-1 3 3 3 3 3 -2 3
-1 4 1 4 0 4

pix_colortrack

click here to DOWNLOAD the source and a help patch.

Information:

This object for Pd/GEM is somewhat abandoned, but the principle with which it works is better than most color tracking algorithms when one wants to track pure colors, that is, the corners of an RGB cube space.

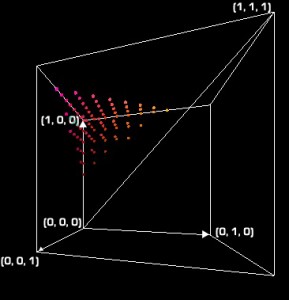
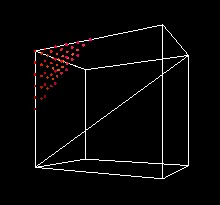
After several experiments with saturation, brightness, contrast and other tests, I discovered that the pixels that correctly tracked the color, were perfectly described by a plane such as the one in the RGB space image beside, leaving the top corner as our objective to track. Instead of this piramid, most video trackers look for a cube on the top red corner, allowing for pixels that are closer to grey than to red.
.
This plane is a 2-dimensional subspace of the 3-dimensional RGB space. To describe it correctly we use three RGB vectors that span it. For example, let’s use these: (0.6 0 0), (1 0.8 0) and (1 0 0.5) and use them as rows of a matrix.
.
0.60 0.00 0.00
1.00 0.80 0.00
1.00 0.00 0.50
.
Since subspaces have to cross the origin, we substract 0.5 (what we will call the red offset) from the red values of the pixels to shift the plane to go through the origin. This leaves us with the vectors (0 0 0), (0.5 0.7 0) and (0.5 0 0.6) and the new matrix:
.
0.40 0.80 0.00
0.40 0.00 0.50
.
Elimination of this matrix leaves us with:
.
0.40 0.80 0.00
0.00 -0.80 0.50
.
Now we can describe the nullspace for this plane:
.
– 1/(1-0.6) * R + 1/0.8 * G + 1/0.5 * B = 0
.
This is the equation for the nullspace of this plane, that is, all RGB sets that when substituted in this equation produce zero. Therefore, all pixels that do not lie on the plane will produce either a positive or negative value, identifiing in that way which ones are above or below the plane.
.
After identifying these pixels, the object makes a histogram of them in both axis of the image and determines the coordinates of the tracked object by finding the median.
.
Because of it’s original intention, that of tracking two mallets the object right now only has red and blue options, but it should be fairly easy to provide other pure colors.
.

HOW TO build a Silent Drum

The Silent Drum: A Tutorial

In this series of posts I will try to explain in as much detail as possible how to build a Silent Drum. The Silent Drum is an open source instrument and the code for pix_drum is released under the GPL license.

This instrument is developed in the Pd or Pure Data and GEM environments. Links to software that is needed are provided along the tutorial.

All patches and code are designed to work “out of the box” provided you have a copy of Pd and drivers for your camera, without you having to compile the objects. Currently, the only platforms supported are intel macs, os x 10.4 or higher and Linux 86_64 (64 bit).

pix_drum is now part of GEM’s extra library, so downloading the current gem will also get you the sources and compiled objects. If you are on Windows, you should be able to get it to work by following Epic Jefferson’s advice. Menno Van der Woude reports developing an OpenFrameworks version.

I run these patches in a 2.1ghz linux box, but have also made them work in a 2.1ghz intel mac. In both cases running the camera at 75fps. Similar machines should make it…

Finally, you must be aware that I am in no way responsible for anything that might go wrong on the way (like if something doesn’t work, you cut your finger, etc.). I will be happy however to hear suggestions and to help whenever possible. Use at your own risk; and pleasure …

Hardware: Parts List.

Hardware: Building.

Software: Tracking.

Software: Mapping Sounds.

Performance Strategies.

Compositions for the Silent Drum.

download the source code and patches for pix_drum. documentation is on the works | bájate el código patches para pix_drum. documentación en proceso.

Click on images in the tutorial to enlarge…

HOW TO build a Silent Drum: Parts List

NEXT: Hardware: Building >>

***************************************

Below is a list of parts. I hope I am not forgetting anything, otherwise you’ll probably need to go back to the stores and leave me a comment; be gentile. If this happens do let me know to update this tutorial and for your comment to guide someone else that decides to embark in the project. Prices are approximate and I have deliberately avoided brands and store names. Do go over the building part before you buy all this stuff to make sure you have enough of everything and understand where to cut things if you can cut them in the stores. Remember with hardware there is no paste, just cut. You might also consider buying a drum stand (20-40$) and a drum key (2$).

STEP 1.
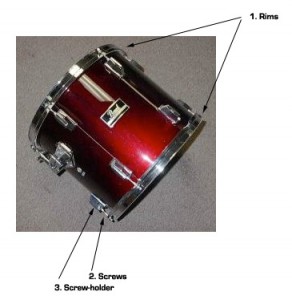
Figure 1. A drum from the web...

The first thing you need to do is to buy a drum. I bought a 14×12 inch (diam=14) used drum for about 50$, but I’m sure you can buy a cheaper one on the web. A few considerations in reference to Figure 1:

  • Make sure the drum has two rims (1), one on each side.
  • Make sure that it has the screws (2) and screw-holders (3) that hold the rims to the shell. The screws look like (1) in Fig. 4.
  • It doesn’t need to sound good at all, so get a nice looking one…

STEP 2.

Then you need to buy spandex. This will probably be one of the most challenging. I have no description of what is the ideal one. You’ll probably have to try it out to find out. However, some of the criterion are:

  • that it returns fast to its original position.
  • that it doesn’t deform over time.

The balance between deformation over time and elasticity is key. While you’re at it, also buy some white elastic, the kind you use inside elastic band clothes (i’ll come with a more accurate description) and some black thread.

You’ll probably spend about 10 $ in this step.

STEP 3.
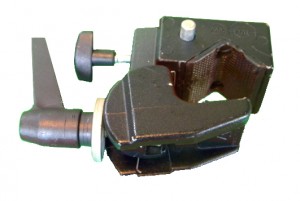
Figure 2. Super Clamp

Then you need to go online or find a store that sells manfrotto equipment. This is I think some of the best equipment, but someone else may provide a better solution. As we will see in the building and calibration sections, the challenge is to get a camera holding system that achieves the most consistent positioning over time.

We need two things from them:

  • A “Super-Clamp” (figure 2 – about 20$)
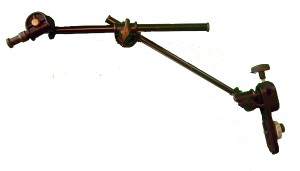
  • Figure 3. Articulated Arm w/bracket

    A “2-Section Single Articulated Arm w/Camera Bracket” (figure 3 – about 40$)

I don’t have specific model numbers. Total cost of this step is about 60$.

STEP 4.

The next stop is at any electronics store to buy a webcam. The camera that I am using is a Playstation Camera called PS3eye which we will use with a driver from the web (see camera drivers). The reason why I use this camera is that it can achieve more than 30fps (actually up to 120fps) at 320×240 resolution for the price. The image quality is great for our purposes.

This step is about 40$

STEP 5.

Figure 4. Screws

Finally head on to a hardware store and get:

  • A roll of nylon fishing line. A thin one will be better.
  • With reference to Fig.4, match the size (diameter) of the screw (1) that came with your drum and get a rod (2) that will fit in the the screw-holder. you’ll have to cut the rod in parts, this will become clear in the building part. It is convenient to cut these in the hardware store…

    Figure 5.

  • With reference to Fig. 5, buy bolts that fit the rod and the top cap.
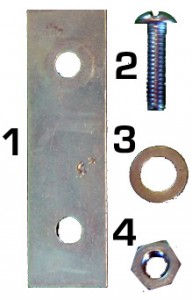
  • With reference to Fig.6, buy a metal piece with two holes and 2 small screws and matching bolts and washers that fit these holes.
  • Figure 6.

    Get 2 bolts that fit the screw in the camera bracket mount that comes with the arm.

  • Get a very hard cement glue to weld “metal and plastic”…
  • A cheap lamp. Mine was about 10$ and white light bulbs; I use 60 watt.
  • A sheet of hard white cardboard. The ones I buy usually have one side which is more reflective than the other. We’ll use that one.

You might want to try to get screws, bolts and rods with the same diameters and so, buying some extra shouldn’t hurt.

This part should cost no more than 25$.

*******************************************************************************************************************

Conclusion: We need a total of around 185$ + shippings, taxes and all those little extras, so be prepared to invest around US$220. With all these materials we are ready to build the drum.

***************************************

NEXT: Hardware: Building >>