NEXT: Hardware: Building >>
***************************************
Below is a list of parts. I hope I am not forgetting anything, otherwise you’ll probably need to go back to the stores and leave me a comment; be gentile. If this happens do let me know to update this tutorial and for your comment to guide someone else that decides to embark in the project. Prices are approximate and I have deliberately avoided brands and store names. Do go over the building part before you buy all this stuff to make sure you have enough of everything and understand where to cut things if you can cut them in the stores. Remember with hardware there is no paste, just cut. You might also consider buying a drum stand (20-40$) and a drum key (2$).
STEP 1.
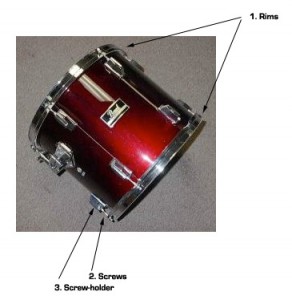
The first thing you need to do is to buy a drum. I bought a 14×12 inch (diam=14) used drum for about 50$, but I’m sure you can buy a cheaper one on the web. A few considerations in reference to Figure 1:
- Make sure the drum has two rims (1), one on each side.
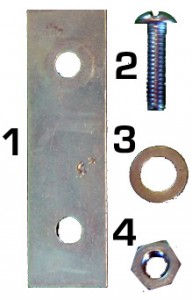
- Make sure that it has the screws (2) and screw-holders (3) that hold the rims to the shell. The screws look like (1) in Fig. 4.
- It doesn’t need to sound good at all, so get a nice looking one…
STEP 2.
Then you need to buy spandex. This will probably be one of the most challenging. I have no description of what is the ideal one. You’ll probably have to try it out to find out. However, some of the criterion are:
- that it returns fast to its original position.
- that it doesn’t deform over time.
The balance between deformation over time and elasticity is key. While you’re at it, also buy some white elastic, the kind you use inside elastic band clothes (i’ll come with a more accurate description) and some black thread.
You’ll probably spend about 10 $ in this step.
STEP 3.
Then you need to go online or find a store that sells manfrotto equipment. This is I think some of the best equipment, but someone else may provide a better solution. As we will see in the building and calibration sections, the challenge is to get a camera holding system that achieves the most consistent positioning over time.
We need two things from them:
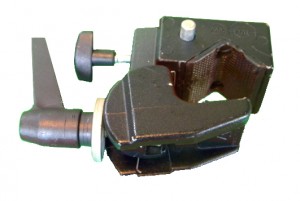
- A “Super-Clamp” (figure 2 – about 20$)
-
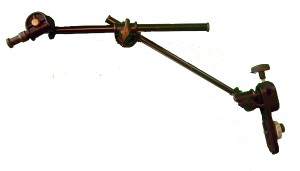
A “2-Section Single Articulated Arm w/Camera Bracket” (figure 3 – about 40$)
I don’t have specific model numbers. Total cost of this step is about 60$.
STEP 4.
The next stop is at any electronics store to buy a webcam. The camera that I am using is a Playstation Camera called PS3eye which we will use with a driver from the web (see camera drivers). The reason why I use this camera is that it can achieve more than 30fps (actually up to 120fps) at 320×240 resolution for the price. The image quality is great for our purposes.
This step is about 40$
STEP 5.
Finally head on to a hardware store and get:
- A roll of nylon fishing line. A thin one will be better.
- With reference to Fig.4, match the size (diameter) of the screw (1) that came with your drum and get a rod (2) that will fit in the the screw-holder. you’ll have to cut the rod in parts, this will become clear in the building part. It is convenient to cut these in the hardware store…
- With reference to Fig. 5, buy bolts that fit the rod and the top cap.
- With reference to Fig.6, buy a metal piece with two holes and 2 small screws and matching bolts and washers that fit these holes.
-
Get 2 bolts that fit the screw in the camera bracket mount that comes with the arm.
- Get a very hard cement glue to weld “metal and plastic”…
- A cheap lamp. Mine was about 10$ and white light bulbs; I use 60 watt.
- A sheet of hard white cardboard. The ones I buy usually have one side which is more reflective than the other. We’ll use that one.
You might want to try to get screws, bolts and rods with the same diameters and so, buying some extra shouldn’t hurt.
This part should cost no more than 25$.
*******************************************************************************************************************
Conclusion: We need a total of around 185$ + shippings, taxes and all those little extras, so be prepared to invest around US$220. With all these materials we are ready to build the drum.
***************************************
NEXT: Hardware: Building >>


Pingback: Hardware: Building